Sunday, April 26, 2020
Mythbusters: Is An Open (Unencrypted) WiFi More Dangerous Than A WPA2-PSK? Actually, It Is Not.
Introduction
Whenever security professionals recommend the 5 most important IT security practices to average users, one of the items is usually something like: "Avoid using open Wifi" or "Always use VPN while using open WiFi" or "Avoid sensitive websites (e.g. online banking) while using open WiFI", etc.
What I think about this? It is bullshit. But let's not jump to the conclusions. Let's analyze all risks and factors here.

During the following analysis, I made two assumptions. The first one is that we are comparing public WiFi hotspots with no encryption at all (referred to as Open), and we compare this to public WiFi hotspots with WPA2-PSK (and just hope WEP died years before). The other assumption is there are people who are security-aware, and those who just don't care. They just want to browse the web, access Facebook, write e-mails, etc.
The risks
Let's discuss the different threats people face using public hotspots, compared to home/work internet usage:
1. Where the website session data is not protected with SSL/TLS (and the cookie is not protected with secure flag), attackers on the same hotspot can obtain the session data and use it in session/login credentials stealing. Typical protocols affected:
- HTTP sites
- HTTPS sites but unsecured cookie
- FTP without encryption
- IMAP/SMTP/POP3 without SSL/TLS or STARTTLS
2. Attackers can inject extra data into the HTTP traffic, which can be used for exploits, or social engineer attacks (e.g. update Flash player with our malware) – see the Dark Hotel campaign
3. Attackers can use tools like SSLStrip to keep the user's traffic on clear text HTTP and steal password/session data/personal information
4. Attackers can monitor and track user activity
5. Attackers can directly attack the user's machine (e.g. SMB service)
WPA2-PSK security
So, why is a public WPA2-PSK WiFi safer than an open WiFi? Spoiler alert: it is not!
In a generic public WPA2-PSK scenario, all users share the same password. And guess what, the whole traffic can be decrypted with the following information: SSID + shared password + information from the 4-way handshake. https://wiki.wireshark.org/HowToDecrypt802.11
If you want to see it in action, here is a nice tutorial for you
 |
| Decrypted WPA2-PSK traffic |
Any user having access to the same WPA2-PSK network knows this information. So they can instantly decrypt your traffic. Or the attackers can just set up an access point with the same SSID, same password, and stronger signal. And now, the attacker can instantly launch active man-in-the-middle attacks. It is a common belief (even among ITSEC experts) that WPA2-PSK is not vulnerable to this attack. I am not sure why this vulnerability was left in the protocol, if you have the answer, let me know. Edit (2015-08-03): I think the key message here is that without server authentication (e.g. via PKI), it is not possible to solve this.
Let me link here one of my previous posts here with a great skiddie tool:
To sum up, attackers on a WPA2-PSK network can:
- Decrypt all HTTP/FTP/IMAP/SMTP/POP3 passwords or other sensitive information
- Can launch active attacks like SSLStrip, or modify HTTP traffic to include exploit/social engineer attacks
- Can monitor/track user activity
The only difference between open and WPA2-PSK networks is that an open network can be hacked with an attacker of the skill level of 1 from 10, while the WPA2-PSK network needs and an attacker with a skill level of 1.5. That is the difference.
The real solutions
1. Website owners, service providers should deploy proper (trusted) SSL/TLS infrastructure, protect session cookies, etc. Whenever a user (or security professional) notices a problem with the quality of the service (e.g. missing SSL/TLS), the service provider has to be notified. If no change is made, it is recommended to drop the service provider and choose a more secure one. Users have to use HTTPS Everywhere plugin.
2. Protect the device against exploits by patching the software on it, use a secure browser (Chrome, IE11 + enhanced protection), disable unnecessary plugins (Java, Flash, Silverlight), or at least use it via click-to-play. Also, the use of exploit mitigations tools (EMET, HitmanPro Alert, Malwarebytes AntiExploit) and a good internet security suite is a good idea.
4. Don't click blindly on fake downloads (like fake Flash Player updates)

5. The benefits of a VPN is usually overestimated. A VPN provider is just another provider, like the hotspot provider, or the ISP. They can do the same malicious stuff (traffic injecting, traffic monitoring, user tracking). Especially when people use free VPNs. And "Average Joe" will choose a free VPN. Also, VPN connections tend to be disconnected, and almost none of the VPN providers provide fail secure VPNs. Also, for the price of a good VPN service you can buy a good data plan and use 4G/3G instead of low-quality public hotspots. But besides this, on mobile OSes (Android, iOS, etc.) I strongly recommend the use of VPN, because it is not practically feasible to know for users which app is using SSL/TLS and which is not.
6. Use a location-aware firewall, and whenever the network is not trusted, set it to a Public.

7. In a small-business/home environment, buy a WiFi router with guest WiFi access possibility, where the different passwords can be set to guest networks than used for the other.
Asking the question "Are you using open WiFi?", or "Do you do online banking on open WiFi?" are the wrong questions. The good questions are:
- Do you trust the operator(s) of the network you are using?
- Are the clients separated?
- If clients are not separated, is it possible that there are people with malicious intent on the network?
- Are you security-aware, and are you following the rules previously mentioned? If you do follow these rules, those will protect you on whatever network you are.
And call me an idiot, but I do online banking, e-shopping, and all the other sensitive stuff while I'm using open WiFi. And whenever I order pizza from an HTTP website, attackers can learn my address. Which is already in the phone book, on Facebook, and in every photo metadata I took with my smartphone about my cat and uploaded to the Internet (http://iknowwhereyourcatlives.com/).

Most articles and research publications are full of FUD about what people can learn from others. Maybe they are just outdated, maybe they are not. But it is totally safe to use Gmail on an open WiFi, no one will be able to read my e-mails.
PS: I know "Average Joe" won't find my blog post, won't start to read it, won't understand half I wrote. But even if they do, they won't patch their browser plugins, pay for a VPN, or check the session cookie. So they are doomed to fail. That's life. Deal with it.
Related posts
- Curso De Hacking Etico Gratis
- Hacking Linux Distro
- Elhacker Ip
- Hacking Significado
- House Hacking
- Hacking Libro
- Hacking To The Gate
- Hacking Websites
Ufonet - Dos And Ddos Attack Tool | How To Install Bot
Related posts
Saturday, April 25, 2020
How To Protect Your Private Data From Android Apps

How To Protect Your Private Data From Android Apps
The method is quite simple and just need a rooted android device that will allow the Xposed installer to run on the device. And after having the Xposed installer you will be using an Xposed module to disallow the apps to have access to your personal or say private data. For this follow the guide below.
Steps To Protect Your Private Data From Android Apps:
Step 1. First of all, you need a rooted android as Xposed installer can only be installed on a rooted android, so Root your android to proceed for having superuser access on your android.
Step 2. After rooting your Android device you have to install the Xposed installer on your android and thats quite lengthy process and for that, you can proceed with our Guide to Install Xposed Installer On Android.
Step 3. Now after having an Xposed framework on your Android the only thing you need is the Xposed module that is DonkeyGuard – Security Management the app that will allow you to manage the media access for apps installed on your device.
Step 4. Now install the app on your device and after that, you need to activate the module in the Xposed installer. Now you need to reboot your device to make the module work perfectly on your device.
Step 5. Now launch the app and you will see all the apps that are currently installed on your device.
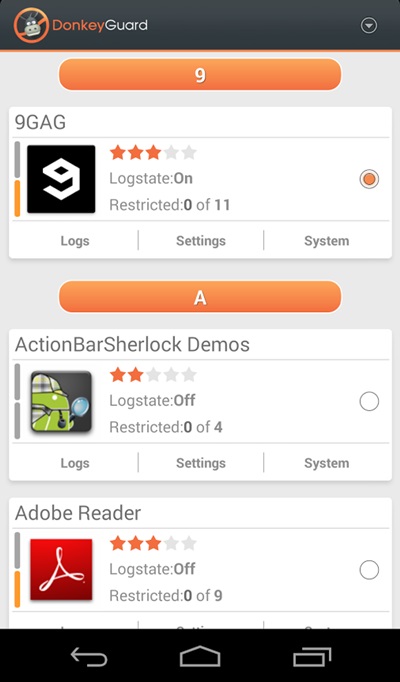
Step 6. Now edit the media permission for the apps that you don't want to have access to your media with private data.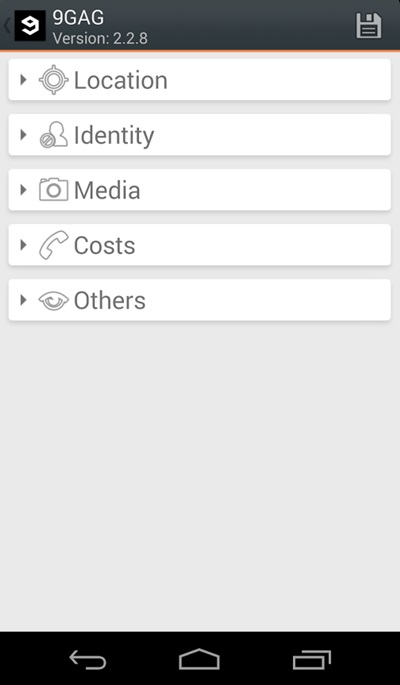
That's it, you are done! now the app will disallow the media access to that apps.
Manually Checking App Permission
Well, our Android operating system offers a nice feature in which we can manage a single app's permission. However, you need to have Android 6.0 Marshmallow or a newer version to get the option.
Step 1. First of all, open Settings and then tap on 'Apps'.

Manually Checking App Permission
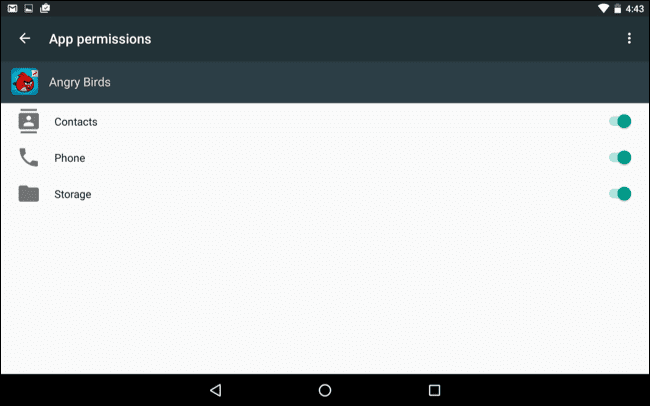
Step 2. Now you will see the list of apps that are currently installed on your Android smartphone. Now you need to select the app, and then you will see 'Permissions.'

Manually Checking App Permission
Step 3. Now it will open a new window, which will show you all permissions that you have granted to the app like Camera access, contacts, Location, microphone, etc. You can revoke any permissions as per your wish.
Manually Checking App Permission
Well, the same thing you need to perform if you feel that you have installed some suspicious app on your Android. By this way, you can protect your private data from Android apps.
- Quiero Ser Hacker
- Hacking Code
- Aprender Hacking Desde Cero
- Hacking Quotes
- Que Hay Que Estudiar Para Ser Hacker
- Servicio Hacker
- Hacker En Español
Should-I-Trust - OSINT Tool To Evaluate The Trustworthiness Of A Company

should-i-trust is a tool to evaluate OSINT signals for a domain.
Requirements
should-i-trust requires API keys from the following sources:
Censys.io - Free for for first 250/quries/month
VirusTotal - Free
GrayHatWarFare - Free with limited results
Use Case
You're part of a review board that's responsible for evaluating new vendors. You're specifically responsible for ensuring new vendors meet compliance and security requirements.
Standard operation procedure is to ask for one or all of the following: SOC report, VSAQ, CAIQ, SIG/SIG-Lite. All vendors will not have these reports and/or questionnaire answers. Maybe it's org process to deny vendor intake without this information, or maybe, this is a "special" engagement and you need to ascertain trustworthyness without the docs. Maybe you don't trust the response in the docs.
should-i-trust is a tool to go beyond standard responses and look for signals that the organization should not be trusted. Maybe they're exposing their CI/CD to the internet with no auth. Maybe they have an EC2 instance with prod code running and no directory restrictions.
should-i-trust doesn't provide all the information you will need to make a go/no-go decision but it will allow you to quickly gather OSINT data for further evaluation.
should-i-trust is also useful for red team or similar engagements. It can quickly identify targets to probe.
Setup
Either install the chrome extension through chrome or download and manually install in chrome using developer mode.
Running
Open the extension
Enter your API keys (required once)
Enter a domain to query
Output
- If there's an indicator the domain participates in a bug bounty program
- Domains found through VirusTotal, Censys.io, and the Google Cert Transparency Report
- IPs and open ports found through Censys.io
- Repositories found on GitHub, GitLab, and Bitbucket
- Misc data found on virustotal.com
- AWS bucket files found exposed through GrayHatWarfare
Road Map
TBD
via KitPloitRead more
- Hacking System
- Paginas De Hackers
- Hacking Wikipedia
- Hacking Language
- Hacking Roblox
- Blackhat Hacking
- Herramientas Hacking
- Hardware Hacking Tools
- Manual Del Hacker
- Hacking Definicion
- Life Hacking
Hackers Trick 3 British Private Equity Firms Into Sending Them $1.3 Million
In a recent highly targeted BEC attack, hackers managed to trick three British private equity firms into wire-transferring a total of $1.3 million to the bank accounts fraudsters have access to — while the victimized executives thought they closed an investment deal with some startups. According to the cybersecurity firm Check Point, who shared its latest investigation with The Hacker News,
via The Hacker News
via The Hacker News
Related news
- Hacking Team
- Hardware Hacking Tools
- Hacker Significado
- Best Hacking Books
- Travel Hacking
- Hacking Net
- Android Hacking
Thursday, April 23, 2020
HOW TO CAPTURE SCREENSHOT IN KALI LINUX? – KALI LINUX TUTORIAL
Kali Linux has been the most advanced penetration testing machine introduced yet. It has the most valuable tools used for every sort of hacking. To take advantage of Kali Linux hacking tools, you have to switch your OS to Kali Linux. You can either install Kali Linux as your default OS or just install as a virtual machine within the same OS. You can learn more about how to install Kali Linux Virtualbox. Today in this tutorial, I am just going to share a very simple Kali Linux tutorial on how to capture screenshot in Kali Linux. It's very simple and newbie friendly.
SO, HOW TO CAPTURE SCREENSHOT IN KALI LINUX? – KALI LINUX TUTORIAL
There are two ways to capture a screenshot in Kali Linux. One is the ultimate easy one and the second one is a bit complex but it's also not so complicated. So, don't worry about anything.
INSTRUCTIONS TO FOLLOW
- In a first way, you can take a screenshot in a similar way as you take in Windows OS by simply clicking the PrntScr button on the keyboard. As you hit that button, a screenshot will be saved in the Pictures folder of your Kali Linux. The major problem with it, it only captures the full screen. We have no control over it to capture a specific window or region.
- The second way is to take a screenshot using the command. For that, open up a terminal in the Kali Linux and type apt-get install ImageMagick.
- Once the command is completed and ImageMagick is installed. We have two options to take a screenshot with it. One is to capture full screen and second is to capture a specific window.
- To capture full screen, type import -window root Pictures/AnyNameOfTheImage.png in the terminal. It will take a full screenshot and will save it to the Pictures directory by the name you specify. Make sure to type .png at the end of the file name.
- To take a screenshot of a specific window or region, type import Pictures/AnyNameOfTheImage.png in the terminal and hit Enter, it will turn the cursor to a selection tool. You just click the mouse button and select the area you want to capture. As you will leave the mouse key, screenshot will be saved in the Pictures folder.
That's all how you can capture screenshot in Kali Linux. This is a very simple and beginner-friendly Kali Linux tutorial to help out all the newbies how they can use this features in need. Hope it will be useful for you.
Related news
- Phone Hacking
- Growth Hacking Pdf
- Nfc Hacking
- Penetration Testing A Hands-On Introduction To Hacking
- What Is Growth Hacking
- Hacking Madrid
- Social Hacking
- Hacking Growth
- What Is Growth Hacking
Wednesday, April 22, 2020
Tishna: An Automated Pentest Framework For Web Servers, Web Applications To Web Security
About Tishna:
Tishna is complete automated pentest framework for web servers, application layer to web security.
Tishna was tested on: Kali Linux, Parrot Security OS, Black Arch, Termux, Android Led TV.
Tishna's interface: Tishna has 62 options with full automation and can be use for web security swiss knife.

Tishna's installation: First, boot your Kali Linux or Parrot Security OS up. Then open Terminal and enter these commands

Appeared:
Brief Introduction
Developer
Support to the coder
You can sponsor and support via BTC.
The bitcoin address: 3BuUYgEgsRuEra4GwqNVLKnDCTjLEDfptu

Related posts
Tishna is complete automated pentest framework for web servers, application layer to web security.
Tishna was tested on: Kali Linux, Parrot Security OS, Black Arch, Termux, Android Led TV.
Tishna's interface: Tishna has 62 options with full automation and can be use for web security swiss knife.
Tishna's installation: First, boot your Kali Linux or Parrot Security OS up. Then open Terminal and enter these commands
Appeared:
- Cyber Space (Computer Security).
- Terror Security (Computer Security).
- National Cyber Security Services.
Brief Introduction
- Tishna is useful in Banks, Private Organisations and Ethical hacker personnel for legal auditing.
- It serves as a defense method to find as much as information possible for gaining unauthorised access and intrusion.
- With the emergence of more advanced technology, cybercriminals have also found more ways to get into the system of many organizations.
- Tishna software can audit, servers and web behaviour.
- Tishna can perform Scanning & Enumeration as much as possible of target.
- It's first step to stop cyber criminals by securing your Servers and Web Application Security.
- Tishna is false positive free, when there is something it will show no matter what, if it is not, it will give blank results rather error.
Developer
Support to the coder
You can sponsor and support via BTC.
The bitcoin address: 3BuUYgEgsRuEra4GwqNVLKnDCTjLEDfptu
Related posts
- Mind Hacking
- Herramientas Hacking Etico
- Google Hacking Search
- Hacking Python
- Hacking With Python
- Grey Hat Hacking
- Hacking With Python
- Hacking 2018
- Hacking With Python
Scanning For Padding Oracles
As you might have heard, we recently got our paper on padding oracle attacks accepted to the USENIX Security Conference. In this paper, we describe and evaluate a scanning methodology with which we found several padding oracle vulnerabilities in devices from various vendors. In total, we found that 1.83% of the Alexa Top 1 Million have padding oracle vulnerabilities.
To test whether a server is vulnerable, we specified different padding oracle vectors which we send to the system under test, using different cipher suites and protocol versions. If the server does not behave identically (on both the TLS and TCP layers), we consider it to be vulnerable to a padding oracle attack, since it is leaking information about the plaintext via behavior differences. Depending on the responses to such padding oracle vectors, one can estimate which implementation is responsible for the vulnerability. We contacted quite a few website owners and tried to cooperate with them, to find out which vendors and TLS stacks are responsible for the identified vulnerabilities. You can find our current disclosure status on this issue on https://github.com/RUB-NDS/TLS-Padding-Oracles.
We are currently in contact with other vendors to fix the remaining vulnerabilities, but the some of the rare (in terms of the number of affected hosts) vulnerabilities are currently not attributed. To fix the remaining vulnerabilities, we ask for your assistance to help get rid of this issue. For this purpose, we integrated a standalone version of our padding oracle evaluation tool into our TLS-Scanner (v.2.7) project. This tool allows you (among other things) to evaluate if a specific server is vulnerable.
When the tool detects a vulnerability, it tries to attribute the vulnerability to a specific vendor or CVE. If we already know of the vulnerability of the server you scanned, the tool will print its details. If the tool does not have a description of the vulnerability in its database, it will ask you to notify us about the vulnerable server, such that we can notify the vendor and get the device fixed. To be clear: the tool never sends any data to us - you have the choice of whether to notify us (and what details to include). There is a chance that the tool's attribution is also mistaken, that is, the tool lists a vendor for your host, but you know for sure that you do not use an implementation by this vendor. Please contact us in such cases as well.
You will need to get TLS-Attacker 2.9 (if you do not already have it):
Now we can clone and install the TLS-Scanner
If you start the TLS-Scanner you should be greeted by a usage info, similar to the one below:
or
This should give you an overview of the supported command line flags. The only really required one is the -connect flag (similar to OpenSSL and TLS-Attacker), with which you specify which host to scan. The most basic command is therefore:
Your output may look something like this:
By default, TLS-Scanner will run single-threaded. In such cases the scanning will take a while; just how long it will take depends on your server configuration. The scanner also supports multi-threading, which drastically improves the performance. There are two parameters to play around with, -threads, which controls how many different "probes" are executed in parallel, and -aggressive , which controls how many handshakes can be executed simultaneously. If you want the fastest results the following parameters are usually a good choice:
But lets get back to the results of the Scanner. Currently the Scanner supports a bunch of well known tests, like supported ciphersuites or protocol versions. These are very similar to what you may be used to from other scanners like ssllabs or testssl.sh.
This section lists the responses of the scanned host for each padding oracle vector, for each cipher suite and protocol version. For hackmanit.de, there is no detected difference in responses, which means hackmanit.de is not vulnerable to the attack:
If we want, we can also look at the concrete responses of the server. For this purpose, we start the scanner with the -reportDetail flag:
With this flag we now get the following details:
So what does this all mean? First of all, we named our malformed records. The interpretation of those names is visualized in the following table:
Next to the name you can see what the actual response from the server was. Alert messages which are in [] brackets indicate that the alert was a fatal alert while () brackets indicate a warning alert. ENC means that the messages were encrypted (which is not always the case). The last symbol in each line indicates the state of the socket. An X represents a closed socket with a TCP FIN, a T indicates that the socket was still open at the time of measurement and an @ indicates that the socket was closed with an RST. So how did Hackmanit respond? We see a [BAD_RECORD_MAC] ENC X, which means we received an ENCrypted FATAL BAD_RECORD_MAC alert, and the TCP connection was closed with a TCP FIN. If a server appears to be vulnerable, the scanner will execute the scan a total of three times to confirm the vulnerability. Since this response is identical to all our vectors, we know that the server was not vulnerable and the scanner is not re-executing the workflows.
Here is an example of a vulnerable host:
As you can see, this time the workflows got executed multiple times, and the scanner reports the cipher suite and version as vulnerable because of "SOCKET_STATE". This means that in some cases the socket state revealed information about the plaintext. If you look closely, you can see that for ValPadInvMac-[0]-0-59, ValPadInvMac-[8]-0-59 and ValPadInvMac-[15]-0-59 the server failed to close the TCP socket, while for all other vectors the TCP connect was closed with a TCP FIN. The server was therefore vulnerable.
Since the server was vulnerable, TLS-Scanner will also print an additional section: "PaddingOracle Details"
In this section we try to identify the vulnerability. In the example above, TLS-Scanner will print the following:
As you can see, we attribute this vulnerability to OpenSSL <1.0.2r. We do so by looking at the exact responses to our malformed records. We additionally print two important facts about the vulnerability: Whether it is observable and its strength. The precise details of these properties are beyond the scope of this blogpost, but the short version is:
If an oracle is observable, a man in the middle attacker can see the differences between the vectors by passively observing the traffic, without relying on browser or application specific tricks. A strong oracle has no limitations in the number of consecutive bytes an attacker can decrypt. If an oracle is STRONG and OBSERVABLE, then an attacker can realistically exploit it. This is the case in the example above.
For more details on this, you will have to wait for the paper.
Could not identify the vulnerability. Please contact us if you know which software/hardware is generating this behavior.
If you encounter this message, we do not know yet who is responsible for this padding oracle and would be happy to know which device/vendor is responsible. If you know who is, please contact us so that we can get in contact with the vendor to fix the issue. To reiterate, the tool never sends any data back to us, and it is your choice whether to contact us manually or not.
There are also some cases in which we can identify the vendor, but the vendor has not patched the vulnerability yet. If you encounter such a host, the scanner will tell you that we know the responsible vendor. To prevent abuse, we do not include further details.
A notable feature of our scanner is that we do not actively try to avoid intolerances (like not scanning with a lot of cipher suites in the Hello messages etc.). We believe that doing so would hide important bugs. We are currently experimenting with intolerances checks, but the feature is now still in beta. If we cannot scan a server (most of the time due to intolerances or SNI problems), the scanner will report a lot of intolerances and usually no supported protocol versions. Some intolerances may trick the scanner into reporting false results. At the current stage, we cannot make any guarantees. If you are using this tool during a pentest, it might be smart to rescan with other scanners (like the recently released padcheck tool from our colleague Craig Young) to find the ground truth (this is good advice in general, since other mainstream scanners likely have the same issues). Note however that it is very unlikely that the scanner reports a false positive on a padding oracle scan.
To test whether a server is vulnerable, we specified different padding oracle vectors which we send to the system under test, using different cipher suites and protocol versions. If the server does not behave identically (on both the TLS and TCP layers), we consider it to be vulnerable to a padding oracle attack, since it is leaking information about the plaintext via behavior differences. Depending on the responses to such padding oracle vectors, one can estimate which implementation is responsible for the vulnerability. We contacted quite a few website owners and tried to cooperate with them, to find out which vendors and TLS stacks are responsible for the identified vulnerabilities. You can find our current disclosure status on this issue on https://github.com/RUB-NDS/TLS-Padding-Oracles.
We are currently in contact with other vendors to fix the remaining vulnerabilities, but the some of the rare (in terms of the number of affected hosts) vulnerabilities are currently not attributed. To fix the remaining vulnerabilities, we ask for your assistance to help get rid of this issue. For this purpose, we integrated a standalone version of our padding oracle evaluation tool into our TLS-Scanner (v.2.7) project. This tool allows you (among other things) to evaluate if a specific server is vulnerable.
When the tool detects a vulnerability, it tries to attribute the vulnerability to a specific vendor or CVE. If we already know of the vulnerability of the server you scanned, the tool will print its details. If the tool does not have a description of the vulnerability in its database, it will ask you to notify us about the vulnerable server, such that we can notify the vendor and get the device fixed. To be clear: the tool never sends any data to us - you have the choice of whether to notify us (and what details to include). There is a chance that the tool's attribution is also mistaken, that is, the tool lists a vendor for your host, but you know for sure that you do not use an implementation by this vendor. Please contact us in such cases as well.
How to use the Tool
First, you need to grab hold of the tool. There are 3 ways to get your hands dirty: pre-compiled, self-compiled or Docker. We provide a pre-compiled version of the tool since the compilation process can get quite messy if you are not familiar with java and maven. You can directly download the resulting project here. However, if you also want to play around with the code, you have to compile everything yourself.Building the TLS-Scanner
For this, you will need (Git), maven (sudo apt-get install maven), OpenJDK-8 (I can guarantee that this version works, other versions might work as well, have not tested it).You will need to get TLS-Attacker 2.9 (if you do not already have it):
Now we can clone and install the TLS-Scanner
Docker
We also provide a Dockerfile, which lets you run the scanner directlyGetting Started
If you start the TLS-Scanner you should be greeted by a usage info, similar to the one below:
or
This should give you an overview of the supported command line flags. The only really required one is the -connect flag (similar to OpenSSL and TLS-Attacker), with which you specify which host to scan. The most basic command is therefore:
Your output may look something like this:
By default, TLS-Scanner will run single-threaded. In such cases the scanning will take a while; just how long it will take depends on your server configuration. The scanner also supports multi-threading, which drastically improves the performance. There are two parameters to play around with, -threads, which controls how many different "probes" are executed in parallel, and -aggressive , which controls how many handshakes can be executed simultaneously. If you want the fastest results the following parameters are usually a good choice:
But lets get back to the results of the Scanner. Currently the Scanner supports a bunch of well known tests, like supported ciphersuites or protocol versions. These are very similar to what you may be used to from other scanners like ssllabs or testssl.sh.
Padding Oracles
The main advantage of our scanner is the ability to scan for padding oracle vulnerabilities (which is probably why you are reading this post). You will see if you are vulnerable in the "Attack Vulnerabilities" section. For example, when scanning hackmanit.de, the result is false. Good for us! But as you might have seen there is also another section in the scanner report:"PaddingOracle Responsemap"This section lists the responses of the scanned host for each padding oracle vector, for each cipher suite and protocol version. For hackmanit.de, there is no detected difference in responses, which means hackmanit.de is not vulnerable to the attack:
If we want, we can also look at the concrete responses of the server. For this purpose, we start the scanner with the -reportDetail flag:
With this flag we now get the following details:
So what does this all mean? First of all, we named our malformed records. The interpretation of those names is visualized in the following table:
| BasicMac-<position>-<XOR> | A Record with ApplicationData, MAC and padding bytes, where the padding byte at <position> is XOR'd <XOR> |
| MissingMacByteFirst | A Record without ApplicationData, where the first byte of the MAC is missing |
| MissingMacByteLast | A Record without ApplicationData, where the last byte of the MAC is missing |
| Plain FF | A Record without ApplicationData & MAC which only contains Paddingbytes: 64* 0xFF |
| Plain 3F | A Record without ApplicationData & MAC which only contains Paddingbytes: 64* 0xF3 |
| InvPadValMac-[<position>]-<appDataLength>-<paddingBytes> | A Record with invalid padding and valid MAC. The Record contains <appDataLength> many ApplicationData bytes and <paddingBytes> many PaddingBytes. The Padding is invalid at <position>. |
| ValPadInvMac-[<position>]-<appDataLength>-<paddingBytes> | A Record with valid padding and invalid MAC. The Record contains <appDataLength> many ApplicationData bytes and <paddingBytes> many PaddingBytes. The MAC is invalid at <position>. |
| InvPadInvMac-[<position>]-<appDataLength>-<paddingBytes> | A Record with invalid padding and invalid MAC. The Record contains <appDataLength> many ApplicationData bytes and <paddingBytes> many PaddingBytes. The MAC is invalid at the first position. The Padding is invalid at <position>. |
Next to the name you can see what the actual response from the server was. Alert messages which are in [] brackets indicate that the alert was a fatal alert while () brackets indicate a warning alert. ENC means that the messages were encrypted (which is not always the case). The last symbol in each line indicates the state of the socket. An X represents a closed socket with a TCP FIN, a T indicates that the socket was still open at the time of measurement and an @ indicates that the socket was closed with an RST. So how did Hackmanit respond? We see a [BAD_RECORD_MAC] ENC X, which means we received an ENCrypted FATAL BAD_RECORD_MAC alert, and the TCP connection was closed with a TCP FIN. If a server appears to be vulnerable, the scanner will execute the scan a total of three times to confirm the vulnerability. Since this response is identical to all our vectors, we know that the server was not vulnerable and the scanner is not re-executing the workflows.
Here is an example of a vulnerable host:
As you can see, this time the workflows got executed multiple times, and the scanner reports the cipher suite and version as vulnerable because of "SOCKET_STATE". This means that in some cases the socket state revealed information about the plaintext. If you look closely, you can see that for ValPadInvMac-[0]-0-59, ValPadInvMac-[8]-0-59 and ValPadInvMac-[15]-0-59 the server failed to close the TCP socket, while for all other vectors the TCP connect was closed with a TCP FIN. The server was therefore vulnerable.
Since the server was vulnerable, TLS-Scanner will also print an additional section: "PaddingOracle Details"
In this section we try to identify the vulnerability. In the example above, TLS-Scanner will print the following:
As you can see, we attribute this vulnerability to OpenSSL <1.0.2r. We do so by looking at the exact responses to our malformed records. We additionally print two important facts about the vulnerability: Whether it is observable and its strength. The precise details of these properties are beyond the scope of this blogpost, but the short version is:
If an oracle is observable, a man in the middle attacker can see the differences between the vectors by passively observing the traffic, without relying on browser or application specific tricks. A strong oracle has no limitations in the number of consecutive bytes an attacker can decrypt. If an oracle is STRONG and OBSERVABLE, then an attacker can realistically exploit it. This is the case in the example above.
For more details on this, you will have to wait for the paper.
Attribution
As you can see, we try to fingerprint the responsible device/implementation. However, we were not able to identify all vulnerable implementations yet. If we cannot attribute a vulnerability you will receive the following message:Could not identify the vulnerability. Please contact us if you know which software/hardware is generating this behavior.
If you encounter this message, we do not know yet who is responsible for this padding oracle and would be happy to know which device/vendor is responsible. If you know who is, please contact us so that we can get in contact with the vendor to fix the issue. To reiterate, the tool never sends any data back to us, and it is your choice whether to contact us manually or not.
There are also some cases in which we can identify the vendor, but the vendor has not patched the vulnerability yet. If you encounter such a host, the scanner will tell you that we know the responsible vendor. To prevent abuse, we do not include further details.
Non-Determinism and Errors
In some cases, the scanner is unable to scan for padding oracles and reports ERROR or non-deterministic responses. The ERROR cases appear if the scanner failed could not handshake with the specified cipher suite and protocol version. This might be due to a bug in the tested TLS-Server or a bug in TLS-Attacker or TLS-Scanner. If you think the handshake fails because of an issue on our side, please open an issue on Github, and we will investigate. The more interesting cases are the non-deterministic ones. In such cases the scanner observed non-identical scan results in three separate scans. This can be due to non-determinism in the software, connection errors, server load or non-homogeneous load balancing. Currently, you will have to analyze these cases manually. In the paper, we excluded such hosts from our study because we did not want to artificially improve our results. But we understand that you as a tester want to know if the server is vulnerable or not. If the server is not truly vulnerable you would see the differences between the answers spread across all the different vectors. If the differences only appear on a subset of malformed records the server is very likely vulnerable. If you are unsure, you can also always scan multiple times (or scan slowly), increase the timeout, or if you are entirely lost get in touch with us.How YOU can help
Please use the scanner on all your hosts and check for padding oracle vulnerabilities. If the scanner can identify your vulnerability, a patch should already be available. Please patch your system! If the scanner does not identify the vulnerability (and instructs you to contact us), please contact us with the details (robert.merget@rub.de). If you can provide us with the detailed output of the scanner or even better, the name of the host, with the corresponding vendor, we could match the results with our database and help fix the issue. We can already attribute over 90% of the vulnerabilities, but there is still a lot to be discovered. We mostly scanned the Alexa top 1-million on port 443. Other protocols like IMAPS, POP3S, etc. might have different implementations with different vulnerabilities. If you find vulnerabilities with our tool, please give us credit. It helps us to get more funding for our project.Issues with the Scanner
A notable feature of our scanner is that we do not actively try to avoid intolerances (like not scanning with a lot of cipher suites in the Hello messages etc.). We believe that doing so would hide important bugs. We are currently experimenting with intolerances checks, but the feature is now still in beta. If we cannot scan a server (most of the time due to intolerances or SNI problems), the scanner will report a lot of intolerances and usually no supported protocol versions. Some intolerances may trick the scanner into reporting false results. At the current stage, we cannot make any guarantees. If you are using this tool during a pentest, it might be smart to rescan with other scanners (like the recently released padcheck tool from our colleague Craig Young) to find the ground truth (this is good advice in general, since other mainstream scanners likely have the same issues). Note however that it is very unlikely that the scanner reports a false positive on a padding oracle scan.
Conclusion
There are still a lot of padding oracle vulnerabilities out there - and a lot of them are still unpatched. We hope you will find some bugs with the tool :) Happy H4cking :DAcknowlegements
This is joint work from Robert Merget (@ic0nz1), Juraj Somorovsky (@jurajsomorovsky), Nimrod Aviram (@NimrodAviram), Janis Fliegenschmidt (@JanisFliegens), Craig Young (@craigtweets), Jörg Schwenk (@JoergSchwenk) and (Yuval Shavitt).More articles
- House Hacking
- Libro Hacking Etico
- Libro Hacking Etico
- Raspberry Pi Hacking
- Hacking Course
- Rom Hacking
- Programas Para Hackear
- Hacking Prank
- Pagina Hacker
How Do I Get Started With Bug Bounty ?
How do I get started with bug bounty hunting? How do I improve my skills?
These are some simple steps that every bug bounty hunter can use to get started and improve their skills:
Learn to make it; then break it!
A major chunk of the hacker's mindset consists of wanting to learn more. In order to really exploit issues and discover further potential vulnerabilities, hackers are encouraged to learn to build what they are targeting. By doing this, there is a greater likelihood that hacker will understand the component being targeted and where most issues appear. For example, when people ask me how to take over a sub-domain, I make sure they understand the Domain Name System (DNS) first and let them set up their own website to play around attempting to "claim" that domain.
Read books. Lots of books.
One way to get better is by reading fellow hunters' and hackers' write-ups. Follow /r/netsec and Twitter for fantastic write-ups ranging from a variety of security-related topics that will not only motivate you but help you improve. For a list of good books to read, please refer to "What books should I read?".
Join discussions and ask questions.
As you may be aware, the information security community is full of interesting discussions ranging from breaches to surveillance, and further. The bug bounty community consists of hunters, security analysts, and platform staff helping one and another get better at what they do. There are two very popular bug bounty forums: Bug Bounty Forum and Bug Bounty World.
Participate in open source projects; learn to code.
Go to https://github.com/explore or https://gitlab.com/explore/projects and pick a project to contribute to. By doing so you will improve your general coding and communication skills. On top of that, read https://learnpythonthehardway.org/ and https://linuxjourney.com/.
Help others. If you can teach it, you have mastered it.
Once you discover something new and believe others would benefit from learning about your discovery, publish a write-up about it. Not only will you help others, you will learn to really master the topic because you can actually explain it properly.
Smile when you get feedback and use it to your advantage.
The bug bounty community is full of people wanting to help others so do not be surprised if someone gives you some constructive feedback about your work. Learn from your mistakes and in doing so use it to your advantage. I have a little physical notebook where I keep track of the little things that I learnt during the day and the feedback that people gave me.
Learn to approach a target.
The first step when approaching a target is always going to be reconnaissance — preliminary gathering of information about the target. If the target is a web application, start by browsing around like a normal user and get to know the website's purpose. Then you can start enumerating endpoints such as sub-domains, ports and web paths.
A woodsman was once asked, "What would you do if you had just five minutes to chop down a tree?" He answered, "I would spend the first two and a half minutes sharpening my axe."
As you progress, you will start to notice patterns and find yourself refining your hunting methodology. You will probably also start automating a lot of the repetitive tasks.
Read more
- Hacking Aves
- Hacking Wifi Windows
- Hacker Significado
- Capture The Flag Hacking
- Raspberry Hacking
- Hacking Windows: Ataques A Sistemas Y Redes Microsoft
- Foro Hacking
Monday, April 20, 2020
"I Am Lady" Linux.Lady Trojan Samples
Bitcoin mining malware for Linux servers - samples
 Research: Dr. Web. Linux.Lady
Sample Credit: Tim Strazzere
MD5 list:
0DE8BCA756744F7F2BDB732E3267C3F4
55952F4F41A184503C467141B6171BA7
86AC68E5B09D1C4B157193BB6CB34007
E2CACA9626ED93C3D137FDF494FDAE7C
E9423E072AD5A31A80A31FC1F525D614
Download. Email me if you need the password.
- Physical Pentest Tools
- Hacker Hardware Tools
- Hack Tools Pc
- Hacking Tools For Mac
- Bluetooth Hacking Tools Kali
- Hack Rom Tools
- Hacker Tool Kit
- Game Hacking
- Hak5 Tools
- Hacker Tools Windows
- Beginner Hacker Tools
- Android Hack Tools Github
- Pentest Tools For Android
- Hacker Security Tools
- World No 1 Hacker Software
- Pentest Tools Apk
- Pentest Tools Online
- Hacking Tools Usb
How To Install And Run Backtrack On Android
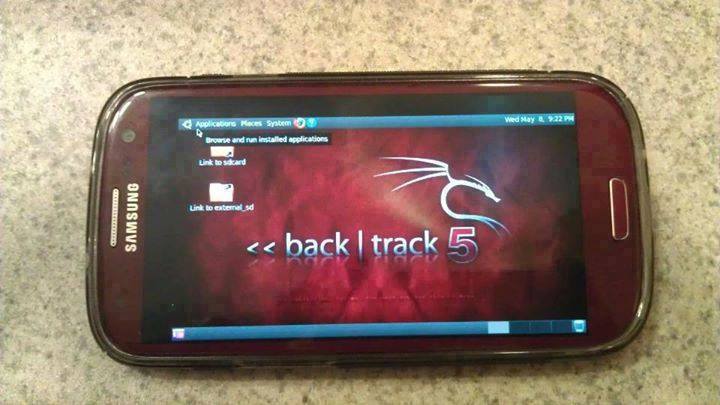
Guide you step by step to How to install and run Backtrack on android. As the Backtrack is also available with ARM architecture which makes it possible to run Backtrack on an ARM machine such as mobiles or tablets.
Recently, We are discussed Install and Run BackTrack on Windows. Android is the best OS for penetration testing. It designed for digital forensics and penetration testing or hacking tool. It comes with many more updated tools. As the Backtrack is also available with ARM architecture which makes it possible to run Backtrack on an ARM machine such as mobiles or tablets.
How To Install and Run Backtrack On AndroidRequirements
- A Rooted Device [ Root Simple Android Phone Without Pc ]
- Backtrack ARM [ Download ]
- BusyBox [ Download ]
- Android Terminal and Android VNC
- If you are using PC then you need 7zip for extraction otherwise you can use zarchiver on your android phone. [ Download ]
Step to Install and Run Backtrack On Android:
First of all extract the BT5-GNOME-ARM.7z. and copy the "BT5" folder and then put in your phone's root directory. Here mine phone is /sdcard. The root directory is different for different mobile devices.
- Now install all the above apps Busybox, Android Terminal, Android Vnc.
- After installing BusyBox application open it and wait until it finishes loading and then click on Smart install.
- Now open the android terminal and type the following command:
su cd /sdcard/BT5sh bootbtNOTE :- When you type su in terminal it will ask you for superuser request and you have to tap on Grant. - After this, type the following commands in terminal.
export USER=rootvncpasswd - After entering vncpasswd the terminal will ask you to enter the password. Enter the desired password and hit enter.
- Now type the following commands.
tightvncserver -geometry 1280×720 - The terminal emulator will create the localhost to connect it to VNC server. Now note the localhost port marked red below. Now minimize the terminal emulator.
- Open the Android VNC and type the following settings.
Nickname : BT5
Password : your password here which you entered in terminal (step no.6)
Address : localhost
Port : 5906
Password : your password here which you entered in terminal (step no.6)
Address : localhost
Port : 5906
NOTE: Make sure that your localhost's port matches with terminal's localhost. Here mine New 'X' desktop is localhost:6. You may be different. So, in VNC type Port 590X where the "X" is the localhost in the android terminal.
That's it now just tap on connect to run the Backtrack on your android. So in this way you successfully install and run backtrack 5 on android. If you face any problem feel free to discuss in below comments!
- Hacker Tools 2019
- Pentest Tools Port Scanner
- Hacking Tools For Kali Linux
- Hacker Tools For Mac
- Bluetooth Hacking Tools Kali
- Top Pentest Tools
- Hack Tools For Ubuntu
- Hacking Tools Download
- Hacking Tools For Windows Free Download
- Hacking Tools Windows
- Physical Pentest Tools
- Hacking Tools Windows
- Nsa Hack Tools
- Termux Hacking Tools 2019
- Nsa Hack Tools Download
- Pentest Tools Tcp Port Scanner
- Termux Hacking Tools 2019
- Pentest Tools For Windows
- What Is Hacking Tools
![]()
